
How to Set up a Native OpenAI Integration
Table of Contents
Native OpenAI Integration

Integrating OpenAI's powerful models into your applications can significantly improve functionality and the benefits of advanced AI to your users. This guide will walk you through the steps to build a native OpenAI integration, covering essential aspects such as API usage, authentication, and optimisation strategies.
OpenAI and its impact
OpenAI's influence in the tech industry. OpenAI is a leader in artificial intelligence research, known for its innovative models like GPT-3. Despite widespread interest, there's no "OpenAI stock" available on the market as OpenAI is not publicly traded. However, keeping an eye on developments related to OpenAI is beneficial for anyone in tech, given its significant impact on the field.
Preparing your development environment
To start building a native OpenAI integration, you need to set up your development environment. This includes installing necessary software, libraries, and tools.
1. Install Python: Ensure you have Python installed on your system. OpenAI's API is commonly accessed with Python.
2. Set Up a Virtual Environment: Use ‘virtualenv’ to create a dedicated environment for your project.

3. Install OpenAI Library: Use pip to install the OpenAI Python library.
Authentication
Authentication is a critical step in ensuring secure access to OpenAI's API.
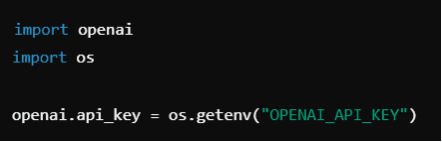
1. Obtain API Key: Sign up for an API key from OpenAI. This key will be used to authenticate your requests.
2. Store API Key Securely: Store your API key in an environment variable or a secure vault. Avoid hardcoding the key in your application.
Building the core integration
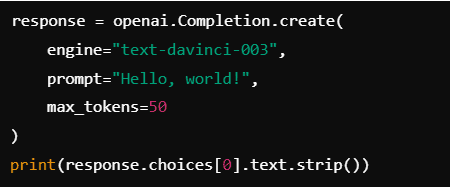
With the environment set-up and authentication in place, you can start building the core functionality of your integration.
1. Basic API call: Make a simple API call to test your setup.
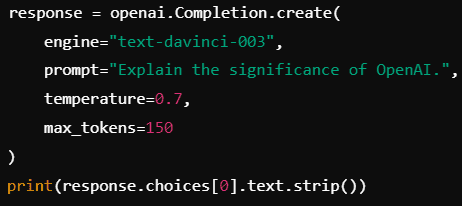
2. Advanced usage: Customize the API call with added parameters such as temperature, max tokens, and more to fine-tune the responses.
Improving with OpenAI reverse proxy
For advanced users, implementing an "OpenAI reverse proxy" can improve performance and add an extra layer of security.
1. Set up a reverse proxy: Use Nginx or another reverse proxy server to route requests to the OpenAI API.
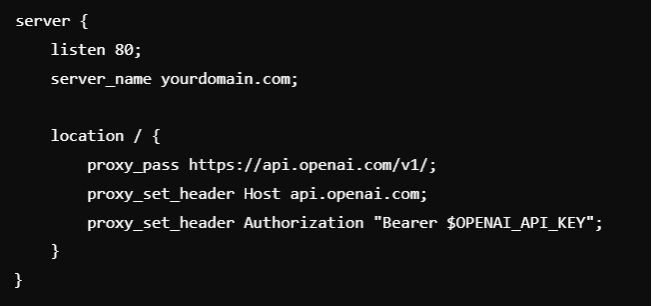
2. Benefits: A reverse proxy can minimize latency, balance loads, and offer additional logging.
Testing and debugging
Thorough testing and debugging are essential to ensure your integration works smoothly.
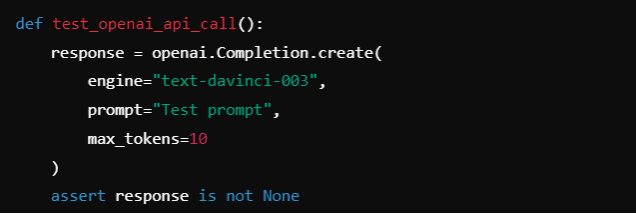
1. Unit tests: Write unit tests for API interactions to catch issues early.
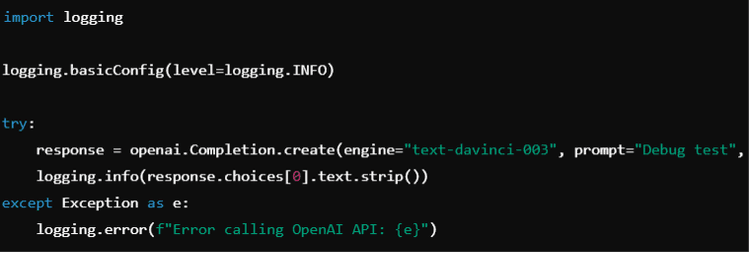
2. Debugging: Use logging and debugging tools to check API calls and handle errors gracefully.
Check OpenAI careers and jobs
OpenAI's contributions to AI research and development make it a desirable place to work. If you're inspired by OpenAI's mission and looking for opportunities, consider exploring "OpenAI careers" and "OpenAI jobs."
1. OpenAI careers: Visit the OpenAI careers page to learn about current openings and the application process.
2. Networking: Connect with current and former OpenAI employees on LinkedIn to gain insights and advice.
3. Preparing for roles: Stay updated on OpenAI's research and projects, as this knowledge will be valuable in the application process.
Building a native OpenAI integration requires understanding OpenAI's impact, setting up your development environment, implementing secure authentication, and improving performance with techniques like reverse proxying. Companies like Klamp.io can aid with embedded integration, and intensify your integration process.
For more info on easy automation solutions visit Klamp Embed & Klamp Connectors